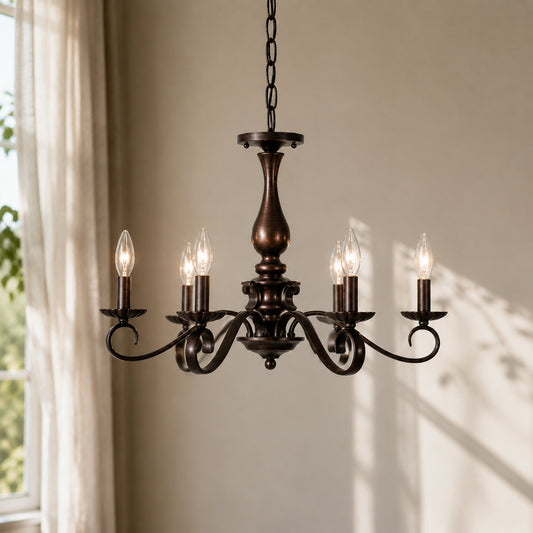
Marsaili Vintage Bronze Scrolling Arm 6-Light Chandelier

10% OFF 13% OFF 15% OFF
10% OFF 1 Item | Lucia10
13% OFF 2 Items | Lucia13
15% OFF 3 Items | Lucia15
$319.00
Size: D 26.6 in x H 13.2 in / D 67.5cm x H 33.5 cm
Free Shipping Icon
Free Shipping
14 Days Return Icon
14 Days Return
Discounts Icon
Exclusive Discounts
Customer Service Icon
Customer Service
Marsaili Vintage Bronze Scrolling Arm 6-Light Chandelier
$319.00
Vintage bronze six-light scrolling chandelier fully shown on the right side of a bright interior Complete vintage bronze six-light scrolling chandelier in a bright mobile composition
Lucia Living · Heritage Metalwork

Vintage Bronze Scrolling Arm 6-Light Semi-Flush Chandelier

Six candle-style sockets sit on balanced scrolling arms, finished in dark brushed red bronze with an adjustable chain for semi-flush or pendant installation.

Product features

Balanced light, adjustable height, visible craftsmanship

Six-light bronze chandelier with all bulbs illuminated

Six-light balanced output

Six evenly spaced E12 candle sockets distribute light around the single-tier frame while keeping the profile open and symmetrical.


Six-light bronze chandelier showing its adjustable chain

Flexible mounting range

The removable 78.7-inch chain supports a compact 17.7-inch minimum overall height or an extended 96.5-inch drop, with sloped-ceiling compatibility when pendant-mounted.

Sculpted bronze detail

Curved scrolling arms, fluted candle cups, a turned center column and a lower bowl finial give the metal frame definition from every angle.

Installation views

One silhouette, different suspension plans

The same 26.6-inch fixture can be used as a single focal point or repeated over a longer surface without changing its six-light structure.

Bronze six-light chandelier centered directly above a writing desk

Single-fixture suspension

A centered chain keeps the turned column and six-arm frame aligned over the surface below.

Two matching bronze six-light chandeliers mounted to a clean ceiling

Matched pair layout

Two identical fixtures maintain equal spacing and consistent mounting height across a longer table.

Dark brushed bronze chandelier against a burgundy wall
Finish and control

★ Dimmable‑Ready Performance

Fine brushed bronze treatment accentuates raised scroll‑work details and turned central column, delivering rich vintage metallic texture across the whole frame.

Pair with matching dimmable bulbs and wall dimmer hardware to tune light brightness freely, keeping the fixture’s original metal silhouette and open candle‑style aesthetic intact.

Specifications

Dimensions and electrical details

Fixture size 26.6 in wide × 13.2 in high
Overall height 17.7 in minimum; 96.5 in maximum
Chain and canopy 78.7 in removable chain; 5.0 in canopy
Material and finish Metal; dark brushed red bronze
Bulbs 6 × E12 candelabra, 60W max each; bulbs not included
Mounting Semi-flush or pendant; adjustable chain; sloped-ceiling compatible when pendant-mounted
Electrical Hardwired, 110-120V US; dimmable with compatible bulbs and dimmer
Bronze bracket measurements showing chandelier width, body height, chain length and adjustable overall drop

Bronze bracket lines show the 26.6-inch width, 13.2-inch fixture height, 78.7-inch chain and 17.7-to-96.5-inch adjustable overall drop.

Close-up details

Scrollwork, cups and turned metal

Turned bronze center column detail Bronze scrolling arm and fluted candle cup detail Bronze chain connector detail

Merci de votre attention et de votre soutien à Lucia Living ! Voici quelques questions fréquemment posées et leurs réponses, dans l'espoir de vous aider à mieux comprendre nos services :

Quels sont les frais de livraison ?

Nous offrons la livraison gratuite pour toutes les commandes passées sur notre site web.

Proposez-vous des retours et des échanges ?

Nous acceptons volontiers les retours dans les 14 jours suivant la date d'achat. Pour être admissible à un retour, votre article doit être inutilisé, dans le même état que lors de sa réception et dans son emballage d'origine. Veuillez joindre la confirmation de commande ou le bon de livraison original à votre colis de retour.

Quelles sont les options de paiement ?

Les modes de paiement acceptés sont PayPal, Visa, Mastercard, Discover, American Express, Diners Club, JCB, Cartes Bancaires, Maestro, UnionPay et Visa Electron. Vous pouvez choisir le mode de paiement qui vous convient le mieux lors du règlement.

Politique de taxe de vente

Lucia Living est tenue par les autorités fiscales américaines de percevoir la taxe de vente sur les commandes expédiées vers certains États américains.

Les taux et les règles relatifs à la taxe de vente varient selon l'État et la localité, et la perception de la taxe dépend de la destination de l'expédition et des lois étatiques et locales applicables.

Le cas échéant, la taxe de vente sera automatiquement calculée et ajoutée au total de la commande lors du paiement.

Toute taxe de vente estimée applicable sera clairement affichée sur la page de paiement avant la finalisation de celui-ci.

Lucia Living perçoit la taxe de vente uniquement en tant qu'intermédiaire requis pour le compte des autorités fiscales américaines compétentes.

L'intégralité des taxes de vente perçues est reversée directement aux autorités gouvernementales compétentes et n'est ni conservée ni contrôlée par Lucia Living.

Remboursements d'impôts

La taxe de vente n'est généralement pas remboursable une fois la commande expédiée ou finalisée, car la taxe perçue est reversée aux autorités fiscales américaines conformément aux lois et réglementations applicables.

Si une commande est annulée avant son expédition, la TVA perçue sera remboursée avec le montant de la commande. Pour les commandes partiellement annulées, la TVA applicable à la partie annulée sera également remboursée. Dans ces cas, Lucia Living mettra tout en œuvre, conformément à la réglementation en vigueur, pour déclarer et obtenir le redressement ou le remboursement de TVA correspondant auprès des autorités fiscales compétentes.

Comment annuler ou modifier une commande ?

Pour annuler ou modifier une commande, veuillez contacter rapidement notre service client. Si la commande n'a pas encore été expédiée, nous ferons tout notre possible pour répondre à votre demande. En revanche, si elle a déjà été expédiée, vous devrez peut-être suivre notre procédure de retour.

Combien de jours les clients ont-ils pour retourner un produit ?

Nous proposons une politique de retour de 14 jours. Les frais de retour sont à la charge du client. Nous vous recommandons d'utiliser un service d'expédition avec suivi afin de garantir la bonne réception de votre colis.

Quel est le montant des frais de réapprovisionnement ?

Si le délai de retour est expiré ou si le retour est dû à des raisons personnelles (comme un changement d'avis, la découverte d'un prix inférieur, etc.), des frais de restockage de 20 % du prix du produit seront facturés.

Quels sont les frais de retour ?

Si un retour est nécessaire en raison d'un défaut du produit, nous offrons la prise en charge des frais de retour ; pour les retours fondés sur une préférence personnelle, les frais de retour réels seront à la charge du client.

Méthode de retour ?

Vous pouvez nous renvoyer votre article par la poste.

Si vous avez des questions concernant la FAQ, veuillez nous contacter à l' adresse support@lucialiving.com .

Merci!

LUCIA installation guide

Plan your lighting.

Room-by-room starting points for fixture size, hanging height, spacing, and clearance.

Room-by-room guide

Choose a space.

Select the setup closest to your room and jump directly to its measurements and placement checks.

01

Dining table

Size and center the fixture from the tabletop, then confirm the view from every seat.

How to measure
Measure the table's length and width. For a round table, use its diameter.
Starting range
A round fixture often feels balanced at about one-half to two-thirds of the table width. A linear fixture can begin at one-half to two-thirds of the table length.
Placement
Center the light over the table, not necessarily the room. Keep the fixture within the table footprint and visually clear of seated sight lines.
Clearance
Start 30-36 inches above the tabletop. With ceilings above 8 feet, raise the fixture only as needed to keep the room open and the light connected to the table.
For a long tableTwo smaller pendants may read more naturally than one oversized fixture.

Lay out the centers evenly along the table and keep the outer fixtures comfortably inside the table ends.

Before drilling

Tape a paper outline to the ceiling or suspend a lightweight template at the planned height. Check it from the doorway and from a seated position.

Dining table pendant placement A pendant centered over a dining table with a vertical clearance measurement. SIDE ELEVATION Ceiling Lowest point Tabletop 30-36 in Centered on the table
Measure
Tabletop to lowest point
Start
30-36 in
Align
Center on the table
Use the table, rather than the room, as the alignment reference.

02

Kitchen island

Coordinate fixture width, quantity, and center spacing across the usable island surface.

How to measure
Measure the usable island length and width, excluding overhangs that do not need task light. Note where people stand and where stools are placed.
Starting range
For a single linear fixture, begin at one-half to two-thirds of the island length. For multiple pendants, choose a modest diameter before deciding how many fit.
Placement
Keep pendant centers evenly spaced on the island centerline. Map equal centers across the usable run, then confirm that adjacent shades retain comfortable breathing room.
Clearance
Start 30-36 inches above the counter. Preserve an open view across the island and keep the outer pendants in from the island ends.
Quantity checkChoose the count only after the fixture width is known.

More fixtures require smaller shades and closer coordination. Fewer fixtures can be larger, but should not crowd the ends of the island.

Lucia note

Mock up the full row, not just one pendant. Three paper circles taped above the island reveal spacing problems much faster than a single sample.

Kitchen island pendant spacing Three pendants spaced evenly above a kitchen island. SIDE ELEVATION Ceiling Equal center spacing Usable island run 30-36 in Match both end insets
Measure
Countertop to lowest point
Start
30-36 in
Align
Equal centers and end insets
Coordinate shade width, fixture count, and center spacing as one layout.

03

Room center

Estimate fixture width from the room dimensions, then check visual weight and walking clearance.

How to measure
Measure room length and width in feet, plus finished ceiling height. Note doors, tall furniture, and the main walking path.
Starting range
Add room length and width in feet. The same number in inches is a common starting diameter - for example, 12 + 10 suggests about 22 inches.
Placement
Use the architectural center only when it also makes sense from the doorway and furniture plan. A seating arrangement may call for a visual center instead.
Clearance
Maintain at least 7 feet of clear height below the lowest point in an open walking area. Low ceilings usually favor flush or compact semi-flush forms.
Visual-weight checkOpen forms can feel lighter; dark or dense shades can feel larger.

Compare one size smaller and one size larger in the room before treating the formula as final.

Before drilling

Confirm that the junction box is rated to support the fixture's weight. Heavy fixtures may require additional bracing.

Room center fixture proportion A plan view showing a round light centered within a rectangular room. ROOM · PLAN VIEW Light fixture Recommended width Room length (ft) Room width (ft)
Formula
Length + width (ft)
Start
Same total (in)
Clear path
7 ft minimum
The room formula sets a starting diameter; ceiling height and visual weight finish the decision.

04

Hallway and entry

Set fixture count from spacing, then keep equal end offsets and a clear walking path.

How to measure
Measure the clear corridor length and width. Mark door swings, openings, stairs, and any point where the ceiling changes.
Starting range
In a narrow passage, begin by testing compact fixtures about 6-8 feet on center, then adjust for ceiling height, beam spread, and light output. Wider entries can support one larger fixture or a more closely spaced rhythm.
Placement
Align fixtures on the path centerline. Start the first and last fixture at roughly half the center-to-center spacing from the corridor ends.
Clearance
Keep at least 7 feet below the lowest point and make sure open doors, tall cabinets, and stair sight lines remain clear.
For unusually long hallsDecide the fixture count from spacing - not from a single oversized diameter.

Once a count is chosen, divide the usable run into equal bays and check the end offsets before wiring.

Lucia note

A dimmer can make repeated fixtures more adaptable across daytime, evening, and overnight use.

Hallway fixture spacing Four ceiling fixtures equally spaced along a corridor. Each end offset is half the center-to-center spacing. PLAN VIEW 6-8 ft on center 1/2 spacing 1/2 spacing Match the first and last offsets
Start
6-8 ft on center
End offset
About 1/2 spacing
Clear path
7 ft minimum
Keep equal center spacing, with about half that distance at each end.

05

Bathroom vanity

Place light for even facial illumination while keeping mirrors, cabinets, and wet locations clear.

How to measure
Measure mirror width, mirror height, vanity width, and the available wall area on both sides. Note the sink centerline.
Starting range
For paired sconces, aim for the visible center of each sconce at about 65-70 inches above the finished floor (AFF), then adjust for fixture shape, mirror height, and the primary user's eye level. For an over-mirror bar, begin around three-quarters of the mirror width.
Placement
Place paired sconces symmetrically on both sides of the mirror. Keep the nearest edge of each fixture about 3-6 inches from the mirror edge where the product shape allows, while keeping the light source near face level.
Clearance
Confirm mirror edges, medicine-cabinet swing, faucets, and adjacent doors. Use fixtures with the appropriate damp or wet-location rating for the exact location.
Most even resultSide lighting usually softens facial shadows better than a single light overhead.

If side wall space is limited, choose a wide over-mirror fixture with a diffused shade.

Before drilling

Hold the sconce at the proposed height while someone checks the reflection. Shift it before wiring if the bulb or bright edge is directly visible in the mirror.

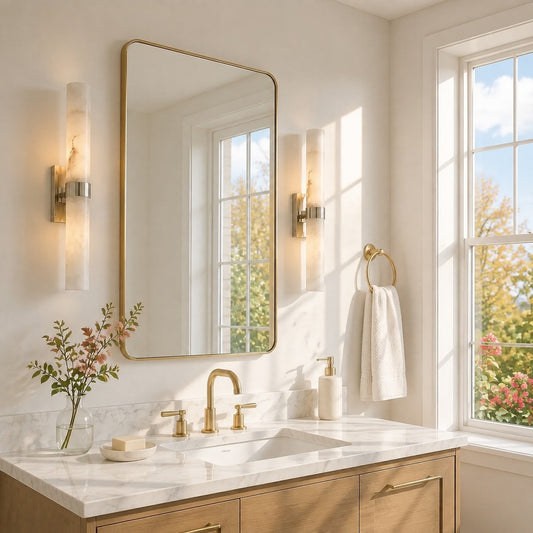
Bathroom vanity sconce placement Two sconces placed symmetrically at the sides of a mirror, centered about 65 to 70 inches above the finished floor and set about 3 to 6 inches from the mirror edges. FRONT ELEVATION Mirror Face level 3-6 in Vanity 65-70 in AFF
Sconce center
65-70 in AFF
Mirror gap
About 3-6 in
Align
Paired at face level
Center side sconces about 65-70 inches AFF, leave about 3-6 inches from the mirror edge, then check the actual reflection before installation.

06

Bedroom and bedside

Set the light from the seated position and keep the switch, shade, and brightest source easy to use.

How to measure
Record mattress-top height, nightstand height and width, headboard height, and the seated shoulder or eye level of the main user.
Starting range
For a table lamp, aim to bring the bottom of the shade close to seated shoulder level. Keep the shade comfortably within the nightstand width.
Placement
Place a wall sconce or pendant where its light falls across the book or bedside surface without shining directly into the user's eyes.
Clearance
Keep swing arms, shades, and cords clear of pillows and head movement. Confirm the switch can be reached from bed without stretching.
Pairing checkMatch the light source height before matching the fixture shape.

Two different nightstand heights may require adjustable lamps or independently set wall lights.

Lucia note

Test the light while seated in bed. A placement that looks balanced from the doorway can still create glare at pillow height.

Bedside lamp height A table lamp beside a bed with the shade bottom aligned near seated shoulder level. SIDE ELEVATION Shade bottom near seated shoulder Set from seated posture Switch within reach
Set height
Seated shoulder level
Keep clear
Pillows and head
Control
Switch within reach
Use the seated position, not the standing view, to set the shade and light-source height.

07

Reading and living

Position the lamp beside or behind the reader so the page is lit without direct glare.

How to measure
Measure seat height, arm height, and the distance from the chair or sofa to the proposed lamp position. Sit in the actual reading posture.
Starting range
For a floor lamp, begin with the bottom of the shade near seated eye level. For a table lamp, use a table height that places the light above the shoulder and beside the page.
Placement
Place the lamp slightly behind or beside the reader's shoulder so the light reaches the page without casting a strong hand shadow.
Clearance
Keep the base out of the walking path and cords away from chair movement. Confirm that adjustable arms do not swing into nearby furniture.
Comfort checkThe bulb and brightest part of the shade should not be visible at seated eye level.

If glare remains, lower the lamp, choose a deeper shade, or use a more diffused light source.

Lucia note

Test the reading light with the room's other lights on and off. A dimmable source makes it easier to balance task light with evening ambience.

Reading floor lamp placement A floor lamp positioned beside and slightly behind a reading chair with the shade near seated eye level. SEATED READING POSITION Shade bottom near seated eye level Light reaches the page Beside or slightly behind the shoulder
Shade bottom
Near seated eye level
Position
Beside or behind shoulder
Keep clear
Walking path
Place the light beside or just behind the reader, with the brightest source out of direct view.

Before installation

Final installation checklist.

Use the recommendation as a starting point, then confirm the final layout on site.

01Fit

Check the fixture from the main viewpoints and keep doors, cabinets, furniture, and walking paths clear.

02Support

Confirm fixture weight, mounting hardware, and junction-box support with a qualified installer.

03Code

Verify product instructions, local electrical requirements, and damp or wet ratings where needed.

Still unsure? Send your room dimensions and a clear photo to support@lucialiving.com.

Return to the size calculator
LUCIA lighting size calculator

Find the right light size.

Choose a room, add a few measurements, and get a practical size and layout recommendation in about two minutes.

Approximate measurements are fine.

Start hereChoose your room below

Step one

Choose a room.

Select the closest match.

Step two

Choose the position.

Step three

Choose a fixture type.

Step four

Add the key measurements.

An estimate is fine if the room is not finished yet.

Refine with ceiling height Add ceiling heightHide details
Your result

Your recommendation.

Recommended size
-
Room checks and practical notes Show room checksHide room checks
Designer note

Before you drill

How this estimate works Read the methodHide the method

Still unsure? Send your room dimensions to support@lucialiving.com and we can help narrow it down.This is a proportional starting point. Confirm fixture weight, junction box support, clearances, and local electrical requirements with a qualified installer.

You May Also Like

Recently Viewed